So, first post in a long, long time. A little over a month ago I was given a Motor Shield V1.0 designed by Seeed Studio for the Arduino Uno. Today, using LEGOs from an old NXT set, I designed a "car" that neatly fit to the Arduino and motor shield. The car is driven directly by two independent gear-reduced motors on the back wheels. At this point I downloaded the example code written by Seeed Studio and was appalled to find that rather than a library supplying simple motor forward / motor back commands, the code was a group of functions to copy and paste to other sketches. I searched around and managed to find... Nothing. Nobody had written a library to control the motor shield, so I decided I would write one. This is my first Arduino library (and first library in general), but I think it turned out pretty well. It has forward, backward, left, right, timed forward, timed backward, timed left, timed right, and the ability to change the speed of the two motors.
If you want to use it in a project of your own, you can download it here:
https://drive.google.com/file/d/0BxlYH0Xw3QsBWkM4RzZVNkFqaEE/view?usp=sharing
The syntax and use is pretty well documented in the example sketch I've included. Comments, suggestions for future projects with Arduino, and suggestions on improvements to my code are greatly appreciated. Thanks!
Saturday, January 3, 2015
Friday, April 12, 2013
Cold Chemistry
So here's a cool reaction that I've done a couple times and have enjoyed the result: a reaction that makes cold. In reality, it doesn't make cold but instead absorbs heat. The first thing you do is follow the earlier earlier experiment I posted involving the making of copper carbonate.
Procedure:
1. Gather materials
2. Measure 50 ml of hot water in the 100 ml beaker (or large glass cup)
3. Measure 25 ml sodium bicarbonate into the 50 ml beaker (or medium glass cup)
4. Add water to 50 ml beaker
5. Bend copper wires and attach to power supply wires with power supply still unplugged
6. Tape power supply wires down
7. Insert wires into 50 ml beaker with the bent parts over the lip
8. Observe beaker
9. Plug in power supply
10. Observe reaction, taking note every thirty seconds for five minutes
11. Take note every 5 minutes until 30 minutes
12. Record final observation at 1 hour
13. Add 80 ml of boiling water to 100 ml beaker
14. Filter out water from from electrolyzing beaker and scrape resulting solids into 100 ml beaker
15. Stir 100 ml beaker contents
16. Re-filter mixture
17. Scrape solids into evaporating dish (a paper plate works too)
18. Wait until solids dry
1. Once you do this you should weigh out 30 grams, about 8 millilitres, and place it in a very large glass.
2. Take 300 milliliters of vinegar and have this in a separate glass.
3. Slowly add small amounts of vinegar to the copper carbonate.
4. The copper carbonate should fizz like soda pop.
5. Slowly add vinegar until the solution stops fizzing.
6. Wrap your hand around the outside of the container. The glass will often be cold enough to cause condensation.
7. Save the remaining solution, this is copper acetate, a very useful and cool substance.
Friday, April 5, 2013
Copper Acetate
I
recently bought some acetic acid, you might know it as vinegar, for
it's acidic properties. Acetic acid is a week acid meaning that it is
relatively safe to use with the main problem being getting it in your
eyes. I recommend wearing eye protection when working with acetic acid. I
know that acetic acid reacts with iron to make iron acetate, but in my
opinion this isn't a very interesting material because it doesn't have
very many uses and the colour is a rather ugly brown. I know that to
make iron acetate you submerse iron in vinegar, and I figured that to
make copper acetate you could do the same and submerse copper in
vinegar. After about a day of letting this reaction happen I checked to
see how it was progressing. The solution had changed very little, all
that had happened was the solution had turned a slight blue colour and
the copper was really shiny. It occurred to me that what had happened
was the acid had reacted with the very thin layer of copper oxide on the
outside of the wire but hadn't reacted with the copper because copper
isn't very reactive. I decide to experiment for a while in trying to
create an copper oxide that would react with the acetic acid. At first I
electrolyzed the solution using copper wires with the idea that the
protons (hydrogen atoms) would be removed from the acetic acid at the
cathode and the hydroxide (water minus a hydrogen) would react with the
copper to make copper hydroxide ( Cu(OH)2 ). I believed the copper hydroxide would react with the acetic acid (CH3CO2H) to make water (H2O) and copper acetate ( Cu(CH3CO2)2
). I was right. The one problem is that the reaction reached
equilibrium, meaning that although there was still reactants, the
reaction couldn’t go any farther because there was too much product
already made. In this case there was enough product made that the copper
in it came back out and started sticking to the cathode in a slimy
sludge-like form. I kept electrolysing the solution but nothing happened
other than more copper slime being produced. All the copper sludge gave
me an idea: what if I took all of that copper sludge and turned it into
copper oxide? I remembered the copper oxide reacting with the vinegar
on the first reaction. Now my only problem was turning the sludge into
copper oxide. I had done so in the past by taking clean copper wire and
electrolysing it in sodium sulfate and then taking the resulting copper
hydroxide, drying it, powdering it, and heating in in a crucible until
it dehydrized and became black copper oxide. I had an idea though. this
was the first time where I had the ability to make semi-pure copper
powder. It had a huge surface area and small volume. This meant it would
be perfect for reacting. I decided the best way to make copper oxide
would be to mix the copper powder with hydrogen peroxide (H2O2)
forming water and copper oxide. I tried this reaction and it worked. My
next step was to add the acetic acid. This worked too. I waited until
the reaction was done and observed the result. It was a dark, green,
clear liquid. I looked online to check and make sure that what I had was
copper acetate. Interestingly enough, aqueous copper acetate was blue,
not green. I decided to filter the product and see if I could get a
different result. Nothing happened. I poured the solution in a jar and
let it sit for the night, when I checked it the next day there was a
layer of clear-green slime on the bottom of the container and the rest
of the solution was a clear dark-blue. I refiltered the solution and got
the result I was looking for: a clear dark-blue solution. When dried,
dark green-blue crystals were formed and when dried slowly larger
octahedral crystals formed. Through further experimentation I determined
that a 1:1 ratio of vinegar and acetic acid was sufficient and optimal
for reaction the copper into copper acetate. Although my crystals were
not as well formed, they looked like this picture I obtained from
wikipedia:

Thursday, April 4, 2013
Electrolysis
Electrolysis is the separation of water, but it can also be thought of as the conducting of electricity through water. Electrolysis is simple:
1. Do this outside because this creates a small amount of chlorine, which is toxic in large amounts, if you're using salt and a small amount of ethane, what most people know as "natural gas" when used on gas stoves, this stuff is explosive when mixed with air in large amounts. Both of these also create hydrogen, which is also explosive when there is a very large amount of it. You will be safe as long as you don't breath a whole over the reaction.
2. Add a small amount of salt or vinegar to some water in a small glass that you either don't care about or got from the dollar store
3. Get a AA, 9V, C, or D battery and attach a copper wire to each side using tape (Electrical or duct tape work best)
4. Take the two wires and stick the ends in opposite sides of the water.
5. From the side, watch the ends of the two wires.
You should notice the wires bubbling, the negative (cathode) side bubbles are made up of a gas called hydrogen, and the positive (anode) side may or may not have bubbles coming off of it. If there are it is oxygen. If there aren't it is because the oxygen that is being produced it combining with the copper to make copper oxide. And oxide is a combination of oxygen and a metal, iron oxide is iron and oxygen. You probably know of iron oxide by the name of rust.
The bubbles are formed because the electricity tears apart the water, which is made up of two hydrogen and one oxygen, into its two pieces. If you look again at the wires, you will see that there is more hydrogen than oxygen. This is because water contains twice as much hydrogen as oxygen, that's why we call it H2O, because it has 2H (hydrogens) and 1O( (oxygen).
Materials list
I don't want my blog only able to be understood by those who have a knowledge of chemistry. I want to keep it simple and stay away from the specifics and WHY things happen, instead I want to focus on WHAT happens. If you are a person out there who sees a post of mine and wants to know WHY, just message me and I will do my best to get back to you. I enjoy explaining it, but I want to keep the main blog as simple for people to follow as possible.
In chemistry there are a lot of fancy terms used to describe things. They sound complicated but they really aren't. Here is a list of the main things you need to know:
Beaker: A glass used in chemistry to measure and hold liquids and reactions
Chemical: A material of a specific type, usually just one. Example: Sugar, Baking Soda, Salt, Copper
Decompose: Break down into simpler pieces.
Electrolysis: Conducting electricity through water with stuff dissolved in it.
Mixture: Stuff combined but not dissolved. Example: orange juice with pulp
Reaction: One or more chemicals combining or separating to create a different chemical or chemicals than what you started with
Solution: A liquid with something else dissolved in it. Example: salt water
Hello World
Hello World
Hello anyone who stumbles upon my blog, and you, person-who-lives-in-Alaska-who-was-the-first-person-to-ever-view-my-blog, my name is Andrew Spangler. I am 16 and my favourite hobby is home chemistry. There are surprisingly large amounts of experiments that you can do using safe chemicals located around your house, and quite a few of them produce colourful, exciting, or strange results. Over the years, the makers of chemistry sets have gotten more and more careful about what they put in their products because they are afraid of lawsuits against them from angry parents whose kids hurt themselves because they didn't follow the instructions given by the kits. This has turned all of the chemistry sets into boring formulaic "baking soda and vinegar" type reactions." Although these reactions are fun for beginners, it really doesn't show the true extent and enjoyable nature of home chemistry. I intend to post the findings of my home-chemistry experiments here on this blog in an easy to follow form for others with a passion or interest in chemistry to follow. As long as you follow the basic safety rules I give, I am reasonably sure that you will have fun while remaining safe.
Electrolysis of Sodium Bicarbonate to produce Copper Carbonate
Electrolysis of Aqueous Sodium Bicarbonate Using Copper To Produce Copper Carbonate.
Experiment done by Andrew and Autumn Spangler for HomeLink Science Fair
Question: How does the amount of time spent electrolysing aqueous sodium bicarbonate (NaHCO3) at 12 volts 2 amps using copper affect the resulting colour of the product?
Hypothesis: The
longer the time spent electrolysing, the bluer the product will become.
I believe this because the solution will become increasingly saturated
with copper ions and those copper ions will react with the sodium
bicarbonate and water to produce sodium carbonate, copper carbonate,
copper hydroxide, sodium hydroxide, carbon dioxide, and hydrogen.
Materials:
50 ml Beaker
100 ml Beaker
25 ml sodium bicarbonate
12V 2A switching power supply
Water
Copper wire, 12 gauge
Evaporating dish
Electrical or Duct tape
Small Glass Jar
Stirrer
Acetic acid
Small Glass Jar
Stirrer
Acetic acid
Procedure:
1. Gather materials
2. Measure 50 ml of hot water in the 100 ml beaker
3. Measure 25 ml sodium bicarbonate into the 50 ml beaker
4. Add water to 50 ml beaker
5. Bend copper wires and attach to power supply wires with power supply still unplugged
6. Tape power supply wires down
7. Insert wires into 50 ml beaker with the bent parts over the lip
8. Observe beaker
9. Plug in power supply
10. Observe reaction, taking note every thirty seconds for five minutes
11. Take note every 5 minutes until 30 minutes
12. Record final observation at 1 hour
13. Add 80 ml of boiling water to 100 ml beaker
14. Filter out water from from electrolyzing beaker and scrape resulting solids into 100 ml beaker
15. Stir 100 ml beaker contents
16. Re-filter mixture
17. Scrape solids into evaporating dish
18. Wait until solids dry
19. Crush resulting material with mortar and pestle until a fine powder
20. Store resulting powder in jar. To test material, add acetic acid, if the material bubbles and becomes a green solution the material is copper carbonate.
Data:
Time
|
Observations
|
0 seconds
|
water is clear, undissolved sodium bicarbonate on bottom of beaker.
|
30 seconds
|
water is light clear blue
|
1 minute
|
slightly darker clear blue
|
1 min 30s
|
darker blue
|
2 minutes
|
blue chunks falling
|
2 min 30 s
|
chunks are depositing on bottom of glass
|
3 minutes
|
chunks reacting with sodium bicarbonate
|
3 min 30 s
|
darker blue
|
4 minutes
|
same
|
4 min 30 s
|
even darker blue
|
5 minutes
|
deep blue, very blue
|
10 minutes
|
really light blue, opaque, slightly green
|
15 minutes
|
aquamarine, opaque
|
20 minutes
|
same colors, but much larger buildup of copper carbonate
|
25 minutes
|
more precipitant
|
30 minutes
|
top buildup, brown/green
bottom buildup, green/turquoise
|
1 hour
|
large amounts of precipitant, greenish black, buildup of copper on cap of negative terminal
|
Notes:
6:30 water becomes slightly cloudy - completely opaque and darkish blue
9:00 light blue, opaque
11:00 green flocculence
17:15 lighter green layer stacked on top of darker lower one
19:17 some green gathers on side
Reactions:
2H2O + 572 kJ → H2+ + 2OH-
|
Cu(II) + 2OH- → Cu(OH)2
|
2 NaHCO3 + energy → 2 Na2CO3 + H2O + CO2
|
Cu(OH)2 + Co2 → CuCO3 + H2O
|
2 Na2CO3 + 4 OH- → 4 NaOH + 2 Co2 + O2
|
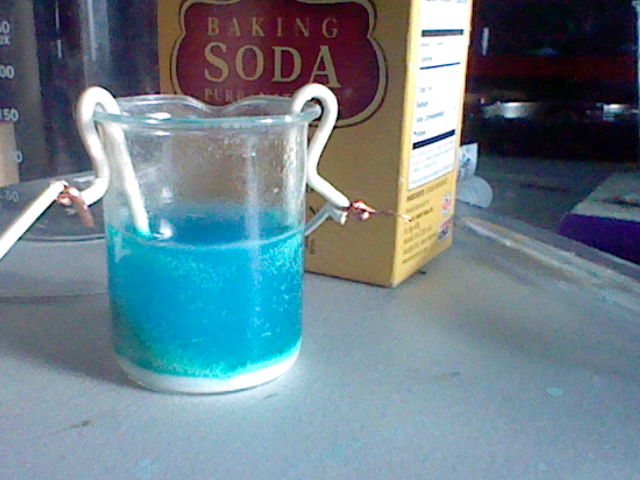 Conclusion: My
hypothesis was correct in that, the longer time I spent electrolysing
the solution, the darker the colour the water became. At first, the
water was a transparent dark blue. Eventually the water became an opaque
light blue and finally a blue powdery slime. The materials copper
hydroxide and copper carbonate gave a blue colour to the liquid. The
carbon dioxide, hydrogen, and oxygen all bubbled out, and the sodium
hydroxide was clear.
Conclusion: My
hypothesis was correct in that, the longer time I spent electrolysing
the solution, the darker the colour the water became. At first, the
water was a transparent dark blue. Eventually the water became an opaque
light blue and finally a blue powdery slime. The materials copper
hydroxide and copper carbonate gave a blue colour to the liquid. The
carbon dioxide, hydrogen, and oxygen all bubbled out, and the sodium
hydroxide was clear. (c) Copyright Andrew and Autumn Spangler 2013
Subscribe to:
Posts (Atom)